Introduction: The Fall of the Perimeter
Historically, web application security relied on a "castle-and-moat" model. Developers built a strong perimeter around their private network using firewalls, VPNs, and IP whitelists. Once a request bypassed the firewall and entered the internal network, it was trusted implicitly.
In 2026, this model is completely obsolete.
With the rise of serverless computing, microservices, third-party API integrations, and distributed remote teams, there is no longer a physical "internal network" to protect. If an attacker compromises a single lightweight serverless function or third-party dependency, they can move laterally through your entire infrastructure, exfiltrating databases and hijacking user sessions.
To secure modern APIs, we must adopt a Zero Trust Architecture.
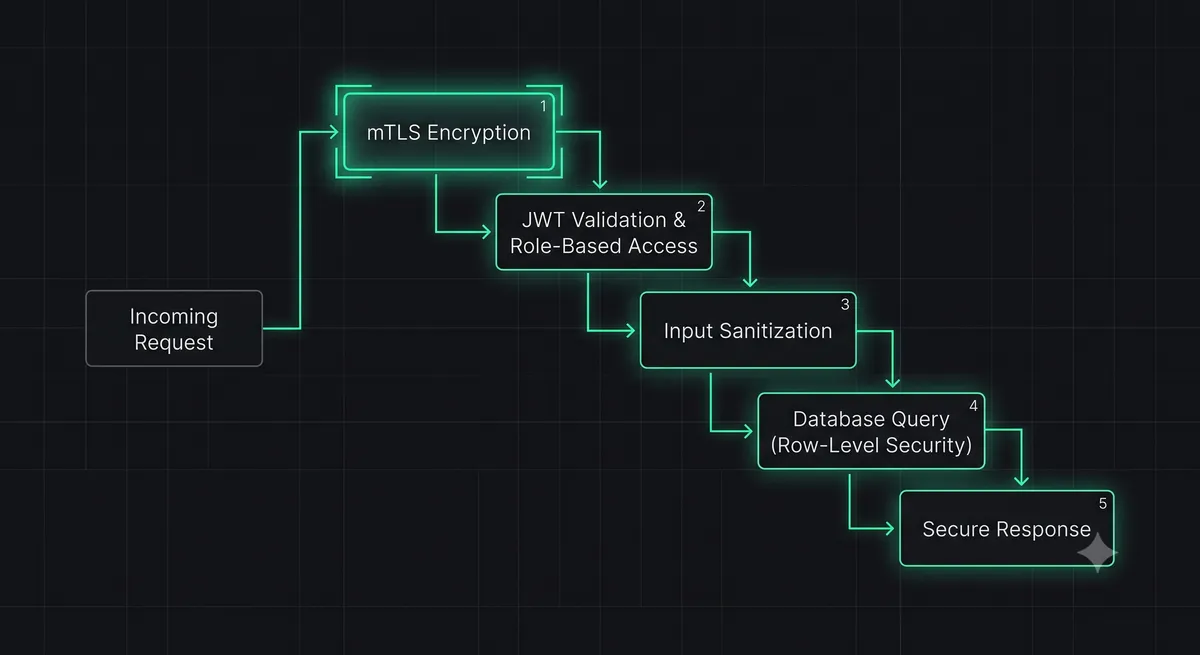
Zero Trust operates on a simple, uncompromising premise: Never Trust, Always Verify. Every request, whether originating from a public browser or an internal microservice, must be authenticated, authorized, encrypted, and sanitized at every single step of its journey.
In this comprehensive security guide, we will explore the core principles of Zero Trust, design a secure API pipeline, and implement a production-ready Zero Trust API gateway in Node.js using Express, mTLS, JWT validation, and strict input sanitization.
What is Zero Trust Architecture?
Zero Trust is a security framework designed to prevent lateral movement and data exfiltration within an application's infrastructure.
Instead of assuming that requests originating from within your network are safe, Zero Trust treats every service-to-service call as untrusted untrusted. It requires continuous validation of identity, device health, and authorization scopes before granting access to resources.
By implementing Zero Trust, even if an attacker successfully injects a prompt or compromises an edge worker, they cannot access your database or internal microservices, because they cannot prove their identity and authorization scopes to the next node in the pipeline.
Core Principles of Zero Trust APIs
A secure Node.js API must implement four core principles of Zero Trust:
- Explicit Authentication & Authorization: Every request must present a cryptographically verifiable token (like a JWT) containing identity and role scopes.
- Least Privilege Access: Services must only have access to the specific resources and endpoints required to perform their task.
- End-to-End Encryption: All data in transit, including service-to-service communication within your cluster, must be encrypted using mutual TLS (mTLS).
- Continuous Inspection & Sanitization: All inputs must be strictly validated and sanitized to prevent SQL injection, XSS, and prompt injection.
Mutual TLS (mTLS) Encryption
In standard HTTPS, only the server proves its identity to the client. In Mutual TLS (mTLS), both the client and the server must present cryptographically signed certificates to each other.
By enforcing mTLS for all service-to-service connections inside your Node.js infrastructure, you guarantee that unauthorized services cannot establish a TCP connection with your backend APIs, completely blocking network-level intrusion.
Cryptographic JWT Validation
Never trust a JWT without validating its signature against your authentication provider's public keys.
In a Zero Trust architecture, every API endpoint must cryptographically verify the token's signature, check the expiration date, ensure the issuer matches, and validate that the token's scopes authorize the requested action.
Strict Input Sanitization
All inputs are malicious until proven otherwise.
To prevent cross-site scripting (XSS), SQL injection, and parameter tampering, your API must enforce strict, schema-based input validation using libraries like Zod or Joi before processing any request payload.
Full Code Implementation: Zero Trust API Gateway
Let's build a secure, production-ready Express API gateway in Node.js that implements mTLS, cryptographic JWT validation, and schema-based input sanitization.
Step 1: Enforcing mTLS on the Node.js Server
Configure Node.js's native https module to require client certificates signed by your private Certificate Authority (CA):
// server.js
import https from 'https';
import fs from 'fs';
import express from 'express';

const app = express();
app.use(express.json());

// Load certificates
const options = {
  key: fs.readFileSync('certs/server-key.pem'),
  cert: fs.readFileSync('certs/server-cert.pem'),
  ca: fs.readFileSync('certs/ca-cert.pem'), // Trust only certs signed by our CA
  requestCert: true, // Request certificate from client
  rejectUnauthorized: true // Reject requests without a valid client cert
};

// Start secure HTTPS server
https.createServer(options, app).listen(443, () => {
  console.log('Zero Trust HTTPS Server running securely on port 443');
});
Step 2: Cryptographic JWT Validation Middleware
This middleware fetches public signing keys from your authentication provider (like Clerk or Auth0) using a JSON Web Key Set (JWKS) and verifies the incoming token:
// middleware/auth.js
import jwt from 'jsonwebtoken';
import jwksClient from 'jwks-rsa';

const client = jwksClient({
  jwksUri: 'https://auth.the-byte-404.com/.well-known/jwks.json'
});

function getKey(header, callback) {
  client.getSigningKey(header.kid, (err, key) => {
    if (err) return callback(err);
    const signingKey = key.getPublicKey();
    callback(null, signingKey);
  });
}

export function validateJWT(requiredScope) {
  return (req, res, next) => {
    const authHeader = req.headers.authorization;
    if (!authHeader || !authHeader.startsWith('Bearer ')) {
      return res.status(401).json({ error: 'Unauthorized: Missing token' });
    }

    const token = authHeader.split(' ')[1];

    jwt.verify(token, getKey, {
      audience: 'https://api.the-byte-404.com',
      issuer: 'https://auth.the-byte-404.com',
      algorithms: ['RS256']
    }, (err, decoded) => {
      if (err) {
        return res.status(401).json({ error: `Unauthorized: ${err.message}` });
      }

      // Verify authorization scopes
      const scopes = decoded.scope ? decoded.scope.split(' ') : [];
      if (requiredScope && !scopes.includes(requiredScope)) {
        return res.status(403).json({ error: 'Forbidden: Insufficient permissions' });
      }

      req.user = decoded; // Attach validated user payload to request
      next();
    });
  };
}
Step 3: Schema-Based Input Sanitization
Use Zod to validate and sanitize incoming request bodies, stripping away unexpected parameters and preventing injection attacks:
// middleware/validation.js
import { z } from 'zod';

// Define strict schema
const UserUpdateSchema = z.object({
  username: z.string().min(3).max(30).regex(/^[a-zA-Z0-9_]+$/),
  email: z.string().email(),
  bio: z.string().max(160).optional()
}).strict(); // Reject any extra unmapped properties

export function validateBody(req, res, next) {
  const result = UserUpdateSchema.safeParse(req.body);
  if (!result.success) {
    return res.status(400).json({
      error: 'Bad Request: Validation failed',
      details: result.error.flatten().fieldErrors
    });
  }

  // Replace body with sanitized, validated data
  req.body = result.data;
  next();
}
Step 4: Putting It Together
Apply the validation and authentication layers to your Express routes:
// routes/user.js
import express from 'express';
import { validateJWT } from '../middleware/auth.js';
import { validateBody } from '../middleware/validation.js';

const router = express.Router();

router.put('/profile',
  validateJWT('write:profile'), // Layer 1: Verify token and scope
  validateBody,                 // Layer 2: Sanitize and validate input
  async (req, res) => {
    // Process update securely...
    res.json({ success: true, message: 'Profile updated securely.' });
  }
);

export default router;
Conclusion: The Zero Trust Mandate
Zero Trust is not a luxury reserved for massive financial institutions; it is a mandatory standard for any modern web application operating in 2026.
By assuming your network is already compromised, encrypting service-to-service traffic, cryptographically validating user tokens, and strictly sanitizing all incoming payloads, you can build resilient Node.js APIs that protect your users and your infrastructure from sophisticated attacks.
To test your secure API endpoints and inspect HTTP status codes, try our interactive HTTP Status Code Lookup Tool, or read our guide on Prompt Injection Security to secure your LLM integrations.